I remember the first time I encountered a progress bar on a writer’s website. I thought, “Oh, cool!”
 I’m visually oriented, so that visual representation of the writer’s progress on his or her current work gave me a much better feel for how near (or far away) the point of completion stood.
I wondered if I would ever add a progress bar to my website, but not seriously, more as a piece of fiction about myself. 😀
Most writers didn’t (and don’t) have such bars on their websites, but every now and then I would see another. I assumed there was a “widget” or a plug-in that produced the bar, but I didn’t think about it too hard.
And then I realized last April that I wanted a progress bar for my work in progress.
I thought about searching among the WordPress plug-ins for one that creates a progress bar, but…
I feel a little embarrassed to admit it, but I’ve forgotten how one does this! The last time I was mucking about with plug-ins was when I set up this website in February 2012, more than 4 years ago. I remember none of the details. I’m sure I could figure it out again. At some point, I’ll probably have to. There will be something I decide I want for my site that cannot be done in any other way.
But I decided to try Google first for the progress bar.
Almost immediately, the results turned up someone’s blog post with the HTML code that would do the job. It seemed very straight forward, so I dove in.
The blogger’s example progress bar was orange on black, and the code looked like –
Before I show you, let me say, “Don’t panic!” I’m going to explain each piece. And the HTML is quite a short string. 😀
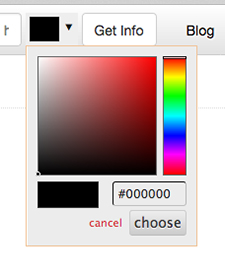
<div id=”progressbar” style=”background-color:#000000;
border-radius:6px;padding:3px;”>
<div style=”background-color:#f96604;width:75%;height:10px;
border-radius:4px;”>
</div></div>
This is the visual that the HTML produces:
Now, you’ll notice that this black and orange bar is a lot longer than the blue bar in my sidebar. That’s because the HTML code does not specify the length, so it simply extends to the edges of the text window.
The text window for the blog post is much wider than the text window for the sidebar, so we get a longer bar.
I don’t like the l-o-n-g progress bar, so if I had been planning to use it in a blog post pinned to the top of my blog, I would have searched for a way to control the length of the progress bar. Because I was planning on putting it in the sidebar, I didn’t need that. So I didn’t go searching. 😀
Now, let’s look at the different pieces of that HTML string.
It is basically two pieces. The beginning of the first piece is <div. The beginning of the second piece is indicated by that same little bit: <div.
In HTML, every piece has to have the beginning indicated and the end indicated.
So the end of each of these pieces is indicated as </div>
Here’s the code with those beginnings and endings highlighted.
<div id=”progressbar” style=”background-color:#000000;
border-radius:6px;padding:3px;”>
<div style=”background-color:#f96604;width:75%;height:10px;
border-radius:4px;”>
</div></div>
So what about those two pieces? What’s in them?
This is the first piece:
<div id=”progressbar” style=”background-color:#000000;
border-radius:6px;padding:3px;”>
The first piece gives the black background for the progress bar.
Now I am not – not – well versed in using HTML. I’ve picked up what I need to know by looking at the HTML windows of my blog posts. And that’s it. I’ve never taken a class. I’ve never even read a book on the subject!
Which means I won’t be able to explain the way a more informed HTML-user would. But I can explain enough so that you should be able to get your own progress bar in your own sidebar to look the way you want it to.
So, in the first piece, the id=”progressbar” is probably simply an identifier, telling the computer, “Hey! This piece here is the progress bar.” Or, it might also tell the computer something about the basic shape of the element – long and thin and straight.
Those of you who do understand HTML are probably laughing right now and thinking, “Does she really think that? Could anybody possibly be so ignorant?”
Well, yes. Someone could, and I am. But, never mind. 😀
Next comes style=”background-color:#000000;
Now I do know what this does. It controls the color of the the background of the bar. #000000 is black.
Next bit, please!
border-radius:6px;
This controls the corners of the bar. My bar has rounded corners. But if you wanted square corners, you get them by changing 6px (6 pixels) to 0px (0 pixels).
Let’s see what that looks like.
Here it is with 3 pixel corners.
And with 6 pixel corners:
padding:3px; controls how much of the background shows around the edges of the ever-changing orange part of the progress bar. Change that 3px (3 pixels) to 0px (0 pixels) and the border goes away altogether.
Change the 3px to 6px (6 pixels), and the border gets very thick.
I like the 3 pixel border.
That’s the whole of the first piece.
Indicator of the beginning <div
Identifier id=”progressbar”
Background color style=”background-color:#000000;
Corner shape border-radius:6px;
Border thickness padding:3px;
The end of the beginning (a greater-than sign) >
A space separates the beginning indicator <div and the identifier id=”progressbar”
Semi-colons ; separate the three pieces of the “style”: color, corner shape, and border thickness.
And a greater-than sign > caps off the whole description.
I always reproduce those separators exactly! If you accidentally omit one, the HTML won’t work the way it is supposed to, and the image on your website won’t be what you intend.
<div id=”progressbar” style=”background-color:#000000;
border-radius:6px;padding:3px;”>
There’s the first piece as a whole.
Now let’s look at the second piece.
The second piece is the ever-changing orange that grows longer as you write more words or shorter when you cut a few out.
<div style=”background-color:#f96604;width:75%;height:10px;
border-radius:4px;”>
<div indicates the beginning. Or more accurately, the beginning of the beginning!
Next!
style=”background-color:#f96604;
That’s the color. #f96604 is orange.
And next!
width:75%;
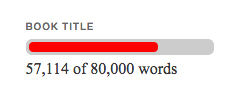
Ah! That’s the bit that controls how much of the black background is covered by the orange. Each time I updated my progress bar, I had to do a bit of math.
When I first put up the bar, I’d written 4,000 words. And I estimated that the book would be 160,000 words long.
4,000 ÷ 160,000 = .025
.025 x 100 = 2.5%
So, instead of width:75%; I needed width:2.5%;
It was exciting when I changed that width:2.5%; to width:5%; at the end of the week!
Next bit!
height:10px;
It controls how thick the overall progress bar is. If you change height:10px; to height:4px;, it gets very thin.
If you change height:10px; to height:20px;, it gets very thick.
I like height:10px; (10 pixels) best.
Next bit!
border-radius:4px;
This controls the shape of the corners of the orange bar.
Change border-radius:4px; to border-radius:0px; and the corners become square.
Let’s try border-radius:3px;
Hmm. I think I like 3 pixels better than 4 pixels. I didn’t tinker this much with the code when I was setting up my own progress bar. I’m going to try 3 pixels when I finish writing this blog post. 😀
And that was the last bit of the second piece.
Here are all the bits that make up the second piece.
Indicator of the beginning of the second piece <div
Background color style=”background-color:#f96604;
Width width:75%;
Corner shape border-radius:4px;
The end of the beginning of the second piece (a greater-than sign) >
However, it’s not quite the end of the HTML code.
We have the first piece.
<div id=”progressbar” style=”background-color:#000000;
border-radius:6px;padding:3px;”>
We have the second piece.
<div style=”background-color:#f96604;width:75%;height:10px;
border-radius:4px;”>
But each of those only just describes the start of each piece. We must also tell the computer, “Okay, that’s enough. End it here.
And each piece needs its very own “End it here.” They can’t and won’t share! 😀
</div></div>
That gives us the whole thing, if we’re okay with orange on black. I wasn’t.
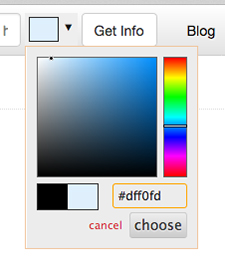
I wanted something that would blend better with the other colors on my website. I liked the idea of dark blue on pale blue. Since #000000 was black, and #f96604 was orange, what numbers would yield the blues that I wanted?
I did some searching and discovered that the whole rainbow of web colors is described by numbers called “color hex codes.” Each is composed of a combination of letters and numbers, six of them. And there are web sites were you can match up the color and the number.
I googled and found one of these sites: http://www.color-hex.com/.

The top navigation bar at http://www.color-hex.com has something labeled “get info.” I clicked the triangle next to that label, and a color picker appeared.
I clicked around on it until I arrived at a light blue that looked good. The hex code for it #dff0fd appeared in the little info box. I copied it and pasted it into the HTML piece that controlled the background of my own progress bar.
<div id=”progressbar” style=”background-color:#dff0fd;
border-radius:6px;padding:3px;”>
The orange on the light blue background does not look good to my eye! Of course, we’re only halfway to what I want.
I clicked around on the color picker some more, until I arrived at a darker blue that looked good. Then I copied and pasted that number #1b8be0 into the HTML piece that controlled the “orange” part of my progress bar.

<div style=”background-color::#f96604;width:75%;height:10px;
border-radius:4px;”>
I finished the first draft of my WIP and sent it off to my first reader this week!
I feel a little lost. It’s time to start work on the cover – and I’ve been searching for the right images for it – but I’m already missing the writing.
I think I’m going to treat myself to writing the short story that’s tugging at my inner artist while I work on the cover.
Let’s see that progress bar with 100%.
140,712 of 140,712 words
And there you have it! More than you ever wanted to know about HTML and progress bars! 😀
On the chance that you want a blue-on-blue progress bar for your website, here’s the complete HTML. Feel free to copy and paste. Remember to change the 75% to the percentage for your WIP!
<div id="progressbar" style="background-color:#dff0fd;
border-radius:6px; padding:3px;">
<div style="background-color:#1b8be0; width:75%; height:10px;
border-radius:4px;">
</div></div>
For more about blogging:
Why I Wanted a Progress Bar
Why Create a Site Map?
Slow Blogging and Other Variations
SPAM Deluge

Thank you for the detailed instructions. A progress bar goes on the To Do list – maybe some day.
Writing as slowly as I do may require a very long bar to show any progress – I’ll think about where to put it so the width of the whole blog is available.
Yours is lovely in blue.
I think I feel guilty for adding to your to-do list.
If your blog allows you to pin a post to the top, you could put your progress bar in a post – with nothing else, so that it didn’t take up much room – and pin that post to the top.
HTML as a concept doesn’t bother me – I’m a programmer from way back. I have learned bits to do the formatting with TextWrangler I needed to get my right indent for the epigraphs at the heads of my chapters.
It’s just that ANYTHING interferes with writing, including breathing! And I’m exhausted from vacation, still – it’s a huge effort and I wouldn’t have skipped it for anything – so it will probably be a few days before I’m writing daily again. But that’s my first priority – books, as you know, don’t write themselves!
I came back to do a tiny bit of publicity for the Kindle Countdown Deals I set up before leaving – it’s better than nothing for now, but not much.
I’ll steal your HTML as soon as I can use it. Hehe.
Steal away! That’s why I posted it. But you know I’m in full agreement with putting the writing first.
This is why we like NaNo, to get access to a tally.
(I confess I pulled back in sheer terror when you started talking HTML.)
I figured that most of the visitors to my blog would probably skip this post altogether, when they saw the HTML. 😀 I could have just presented the code and suggested that those who wanted a progress bar on their site simply copy and paste. (Which I do so suggest at the bottom of the post. Hah!) But I was beguiled into explaining exactly what the different pieces of HTML do. Alas! 😀