 Think of your house as a chimney.
Cold air seeps inside under the front door and the back. Cold air creeps through any breaks in the insulation on the outer walls. Cold air gathers atop the foundation wall where the floor joists rest.
Once within, the cold air warms and rises. Rises to the ceilings, rises up the stairwell, and then soars out the attic fan or the gable vents. Whoosh! There’s a draft, a current, to pull more chilly air in at the bottom. Which warms and rises and leaves.
That’s how a house without air sealing works! It’s not the way to stay warm in winter. Sealing the leaks in a building’s envelope is more critical than beefing up its insulation. A house with no leaks and little insulation will stay warmer than one with lots of leaks and lots of insulation.
(Yes, it’s late fall as I write this, and today was cold, so I’m focused on heat. But air sealed houses retain their cool air in summer better, too.)
My house was built in 1949 and featured lots of leaks when we bought it. Heating it in cold weather cost a fortune! My husband and I added insulation to the crawl spaces under the roof, and that helped the rooms immediately under the roof feel cooler in summer and warmer in winter. But our utility bills remained high.
We signed up for a mini energy audit offered by our electricity provider and learned both why and what to do. More than anything our home needed air sealing. And there were some simple ways to improve its leaky state.
 The first step was closing off any upper escape hatches for warm air. Without that suction, less cold air would be drawn into the house. For us, this was the whole house fan at the top of the steps. All the insulating in the eaves had also air sealed them. We just hadn’t finished the upper level job when we left the fan as we found it. And that one opening was ample as a chimney top! Whoosh!
There are expensive covers you can buy to seal off whole house fans, but we opted for the cheap solution: insulation panels of rigid foam secured by painter’s tape. Not elegant, perhaps, but neat and functional.
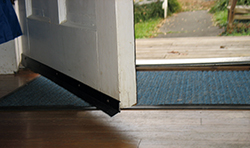
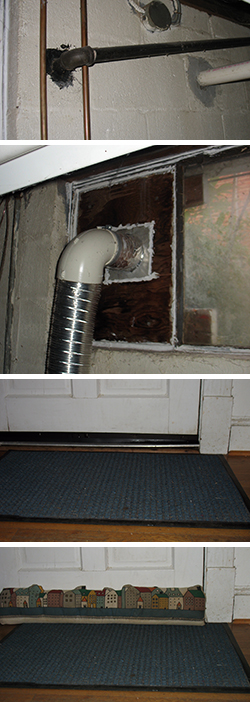
 The next steps involved locating all the undesired air intakes. All our exterior doors featured gaping cracks between door and threshold. The water and gas supply pipes displayed daylight shining through their holes in the basement cinderblocks. The dryer vent, likewise. And all the electrical outlets on the outer wall acted as conduits of cold air from outside to inside.
We used sprayable foam to seal the pipes.
We used calk to seal the dryer vent.
The front, back, and basement doors received bottom sweeps. Plus the front door, cut extra high off the floor by the previous owners to clear what must have been a very plush carpet, is reinforced by a sort of “pillow” designed to block draughts.
 We sealed the electrical outlet boxes like this:
1 • Flip the circuit breaker for the outlet to off (or remove its fuse, if you have a fuse box). If your screwdriver should slip, you don’t want it slipping into a live socket!
2 • Remove the old cover.
3 • Place a special insulation pad over the gaps around the outlet. These may be purchased in a hardware store. Don’t jury rig your own with styrofoam trays or something else which might be flammable. Live electricity is close to the pad – don’t risk a fire!
4 • Replace the standard cover with a child safety cover. The sliding protectors not only keep little fingers out, they stop airflow!
Our energy auditor also recommended we seal the gap that most older houses have above the foundation wall. The floor joists rest there, and only one thin 2×8 separates outside from inside. Sealing the joist area is more involved than all the other projects I’ve described, so it’s still on our to-do list. I sealed one of those cold-air pockets this afternoon, and took photos, so you can see how the project goes. It is something a home owner can do him- or herself.
 1 • Gather your tools: utility blade, old bread knife, goggles, gloves.
2 • Gather your materials: rigid insulation, paper for a pattern, spray foam.
3 • Use the paper to make a pattern. I merely folded and taped mine, fairly roughly. Then I traced it onto the rigid insulation.
4 • Cut 2 rectangles of rigid insulation and check the fit. Mine were initially too large, so I had to trim them. Twice! You definitely don’t want to be trimming after you’ve started spraying foam. The utility blade worked fine for my first cut. Zoop! Snap! Done! It kept catching after that and giving a very jagged edge. The old bread knife worked really well. (Really! Weird, huh?)
5 • Put on the goggles and your gloves. I wondered if I really needed all the protective gear. I did! All the photos I’d seen of the procedure in a DIY book made it look neat and tidy. And the spray can featured a lovely trigger. How messy could it be? For a non-pro: very messy! The foam emerged from the nozzle in unpredictable spurts. It dripped and occasionally went wild. The nozzle fell off once between spraying sessions, and I had to attach the oozy straw to the dispenser. I ended with spray foam all over my gloves, some on the wrist cuff of my new sweatshirt, and one far-flung gob on the drawer of the tool chest! Wear the gloves and the goggles. The foam is not benign on the skin or in an eye!
6 • Spray the corners of the “box” at the end of the joists with foam.
7 • Place the first rigid insulation rectangle; the foam will harden in a few minutes and hold it in place.
8 • Spray the edges of the rigid insulation where they meet wood.
9 • Place the second rectangle of rigid insulation and spray its edges.
10 • Keep going with the next joist over! The spray foam is best used all in one session of DIY. It clogs the dispenser, if it sits unused for more than 2 hours after the first spray. And once it clogs, it’s done.
This afternoon’s sealing session went pretty smoothly, despite the mess. My photos show that my work is definitely not neat. But it’s not a Jackson Pollock painting either! I’m thinking we should move the complete project higher among our priorities. It might take a weekend, but it won’t be hard.
In the meantime, how is our house performing? Are our energy bills still going up like smoke? Well . . . no. Or, at least, not right now. The cost per BTU may keep shooting for the moon, but the January bill after our air sealing was $100 less than the previous (un-air-sealed) January. And it wasn’t because the weather was warmer. That particular month delivered extra snowfall and extra chill. So even the simplest air sealing projects paid big dividends.
Have you tackled any energy-efficiency projects on your home? Were they challenging? Easy? Did your bills go down? I’d love to hear about your experiences.
For more on green living, see:
Green Housekeeping
Grass Green
Permaculture Gardening
