Why to Add a Lemon Rinse to Your Hair Care Routine

beautiful hairSome years ago I learned that the soaps and lotions and shampoos we moderns use can be nearly as harmful – over the long haul – as the cosmetics used by the ancient Egyptians or the Renaissance English and Europeans. I looked for safer alternatives. Finding them was quite a search. Many offered on the marketplace were just as bad or didn’t work or irritated my sensitive skin.

Eventually I found a handful of products that worked for me. (Discovering along the way that conventional products had been irritating my skin in a chronic, low level way that I thought was normal for me. It was not.)

But my hair was shorter then. As it’s grown to shoulder length, I’ve found myself wishing for some kind of conditioner. Not enough so as to take up another laborious search. More as a passing wish when I combed my hair.

I’m not really sure how I stumbled upon homemade lemon rinse. Something must have prompted me to do a little googling, but I no longer remember what it was. I bopped around a few websites, and what I learned made me decide to give it a try. Naturally I’m going to share my experience with you. 😀

First some basics.

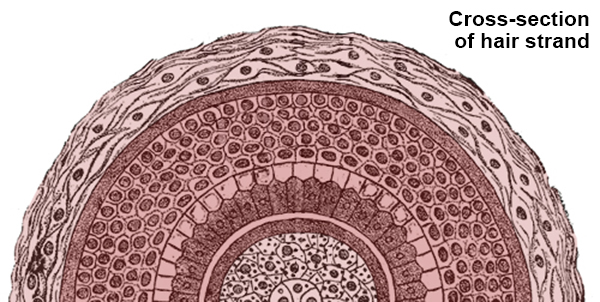
A strand of hair has layers, sort of like an onion (or an ogre, if that ogre is Shrek). At the core is a pith or marrow that is light and airy. It occupies about one-third the diameter of the strand. Around it are rod-like bundles of keratin. And on the outside is the cuticle, a layer of flat, thin cells that overlap one another like roof shingles.

hair cross-section

Normal hair is somewhat acidic.

Substances that are acidic have a pH between 0 and 6.9. While those that are alkaline have a pH between 7.1 and 14. (A pH of 7 is neutral.) Human hair varies between 4.5 and 5.5.

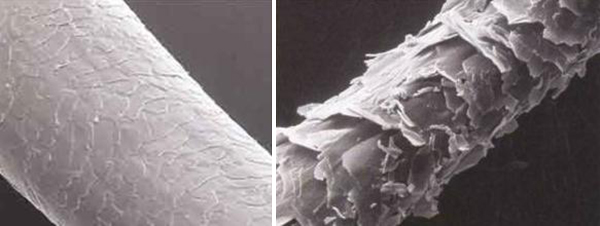
This natural acidity of human hair prevents fungi and bacteria from growing on it. That’s critically important, obviously, but the acidity serves one other important function. When the hair strand has its proper acidity, the cells of its cuticle lie flat and tight, creating a smooth outer surface. When the hair is less acidic than it should be, the cuticle cells loosen and flap, creating a rough surface.

For this reason, a vinegar or lemon rinse serves as a beautiful conditioner.

Electron microscope scans of human hair

Reading about it, I wasn’t sure I believed it. It seemed to simple. Too easy. But I decided to try it.

I purchased some ReaLemon® juice and mixed 2 tablespoons of it with 1-1/2 cups water, and poured the solution into a ketchup dispenser.

homemade hair rinse
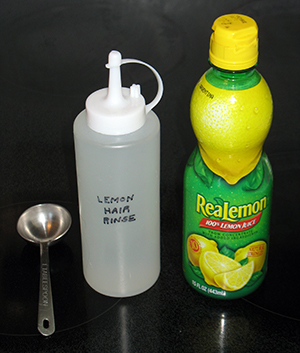
(You need to dilute the lemon juice with water, because undiluted lemon juice is too acidic. You want a rinse that will put your hair right smack in the middle of its natural range.)

When I next washed my hair, after I’d rinsed out the hairwash under the shower, I poured my homemade lemon rinse over my tresses, gently working it into the strands and into my scalp (which should also be mildly acidic).

I was astounded to notice that my hair did indeed feel slippery, just like with using a conventional conditioner, except without that super gooey, gunky feeling. My hair felt slippery, but still clean. Once I was out of the shower, dry, and in my robe, I took a comb to my hair. And was delighted to have the comb slide through the strands easily. Yay! Total success!

ETA: I did rinse the lemon rinse out of my hair after I’d worked it in. You don’t want to simply hop out of the shower leaving the lemon in. Let it do its work of making the hair strands properly acidic and then rinse the lemon away.

That experiment was 6 months ago, and I’ve continued to be very pleased with the results of my lemon rinse. It works. Simple as that.

I do have one caution, if you decide to make your own lemon rinse experiment.

I like to keep my rinse right in the shower with my hairwash and soap. I can do so when I use ReaLemon® as my source for lemon, because it has preservatives in it. But one time I ran out of ReaLemon® and couldn’t find it at the grocery store. I purchased the type of lemon juice that must be kept refrigerated. After 3 days of sitting in my bathroom, my rinse had a nasty coating of mold floating on the top, and I had to throw it away.

So, if you prefer to avoid the preservatives (and I do in the food I eat, but I’m willing to suffer them in my hair rinse for the sake of convenience), keep your lemon rinse in the fridge, pull it out for your hair washing, and put it back after. 😀

For more about safe and effective toiletries, see:
Hair Wash with Rhassoul Clay
Great Soap & Etcetera Quest
Facial Soap Eureka


For more info about alternative hair care, see:
Kanelstrand.com


Share

Bandanna Gift Wrap

four packages wrapped in bandannasBandanna gift wrapping came to my household through sheer desperation. It was the middle of November several years ago, and I’d just ripped the cartilage in my hip joint. I could not stand without pain. Walking was even more difficult. How was I to do all the holiday prep needed to make our winter celebration a celebration?

The gifts were largely already acquired. I’d started early. And my husband, with his background of restaurant cooking, took over both daily meal prep and holiday meal planning. But I’d always been the gift wrapper, and the regular wrapping deal was not going to work this time.

I decided to throw money at the problem: reuseit.com stocked some really festive cloth bags with ribbon closures. I’d seen them and coveted them, but refrained due to their pricey nature. Now, I would refrain no longer. (Although, since these would envelop family presents, they could be used again and again. So the short-term expense would likely be a long-term savings.)

I purchased a bundle of them, winced at my total at checkout, and clicked the finalizing button.

And my solution working excellently. I merely popped each gift into its bag, tied the ribbon, and safety pinned a tag on it. Done!

The ease and simplicity spoiled me for gift wrapping from then on. I didn’t want to go back to paper. The cloth bags were prettier, easier, and didn’t contribute to our overfull landfills. But . . . eight dollars or more per bag? Ouch!

I perused the reuseit site again. Was there anything less expensive? No. There were only more expensive options! But one of them gave me an idea. It was a beautiful wrapping cloth derived from Japanese heritage. The how-to video showed the simple method by which one secured the cloth around a gift. And I thought: why not use a bandanna? I can get those for a dollar each!

I never looked back. Birthdays, anniversaries, housewarmings, hospitality – all these occasions feature bandanna-wrapped gifts from me. Since we have winter holidays approaching as I write this, I want to show you how I do it. Maybe you’d like to try it yourself!

First, gather your supplies: bandannas, gift tags (I use small white paper circles that I cut myself), and safety pins.

bandannas, tags, safety pins

Next, place the gift on your chosen bandanna and wrap the the cloth around it.

photos of wrapping bandanna around gift

Then gather the two pointy ends in your hands, bring them together, and tie a knot. Arrange the folds of cloth to look good. They will stay put, especially if you make the knot snug.

Now pin your tag onto the bandanna. I usually put it to one side of the knot, to make it easy for the opener to untie the knot.

hands poised to pin tag on gift

And there you have it! No cutting – and cutting too small or too big. No taping and then taping it again when the paper starts to unfurl. Just fold the cloth around your gift and tie.

photo of gift wrapped in bandanna

Bonus tip: last year we had some really bulky gifts. I bought fabric at a sewing store, used pinking sheers to prevent the edges from unraveling, and ribbons to secure the ends (like a giant toffee). No need to abandon my cloth habit, just because bandannas weren’t big enough!

Update: Videos showing wrapping with cloth here!

For more on green living, see:
Waste-Free Lunch
Green Housekeeping
Great Soap & Etcetera Quest


Share

Green Housekeeping

There′s a lot of ″green″ advice in books, in magazines, and online. Too much of it describes what we should do, or what might be good to do, or what somebody plans to do. We all know what happens when theory gets practical: the bugs jump out.

house-shaped windows of green texturesGreen Housekeeping by Ellen Sandbeck is a different animal altogether. Too quirky to be anything but real, the book describes her actual experience and why her practice is effective.

I′ll follow my ″three cool things″ format of recommendation, starting with the method that won my own housekeeping-averse heart.

Cleaning Simplicity

There are two magic ingredients: vinegar and hydrogen peroxide. Both are safe, natural substances produced by living organisms. (Our own bodies actually create hydrogen peroxide – H2O2 – as a byproduct of our metabolism.)

When hydrogen peroxide encounters organic material (think germs) it releases its extra oxygen atom, becoming mere water (H2O) in the process. That′s what all that foaming and bubbling is when you spray: the extra oxygen is popping off and killing bacteria.

Vinegar kills a lot of bacteria on its own, but hydrogen peroxide kills 100 times as many. When you give a squirt of both, you get another tenfold increase.

Let′s look at some numbers. Say a splash of vinegar from your spray bottle kills 1000 bacteria. A misting of hydrogen peroxide alone would zap 100,000 bacteria. While a spray of both gets 1 million. But all that′s left after spraying is harmless water. No chemical residue. I like it!

photo of safe cleaning solutionsAll you need is a spray bottle of vinegar and an original bottle of hydrogen peroxide with a sprayer cap screwed onto it. Put one pair in your kitchen and another in each bathroom. You′re set to keep those critical places safely clean.

Why the original bottle? Hydrogen peroxide loses its extra oxygen very easily. Just decanting it into another container can make that happen, as can light shining through a translucent spray bottle. You want water as an end product after cleaning, not as a starter!

Once I placed my paired solutions on location, I found myself using them frequently. Not running to fetch them was just as magical as the solutions themselves. (Needing to fetch often leads to not fetching at all, for me.) Just: squirt! squirt! done! (Or add a quick swipe with the microfiber rag kept by the bottles, if adhering toothpaste or avocado needs a scrub.) Cleaner sinks!

Laundry Boost

photo of laundry product named BerryPlusI use Berry+ and soap ″nuts″ to launder clothes and household linens. Soap ″nuts″ (or soapberries) are fruits of the tree sapindus mukorossi. The fruits can be used dried or to create a liquid extract (Berry+).

Why don′t I choose one or the other?

Convenience.

We do a lot of cold water laundry loads. I love being able to pop open a capsule of Berry+, pour it into the washer, close the lid, start the cycle, and go.

photo of soap nuts loose in a dish plus a laundry bag full of themSoap nuts must either be soaked for 5 minutes in warm water (then dumped along with the soak water into the washer) or tossed into a washer destined for a warm or hot water wash. Since my husband and I are both allergic to dust mites, our sheets, pillowcases, blankets, and towels must be laundered in water over 130°F. (The high temp gets rid of the allergens.) Soap nuts are perfect for that job.

The advantage of both soap nuts and Berry+ is that the outflow spilling from my washer to the water treatment plant is non-toxic. Soapberries have been used by the peoples of Asia and by Native Americans for thousands of years. That′s time tested!

I fell in love with soapberries when I found that my berry-laundered clothes developed almost zero static cling in the dryer and emerged from it smelling faintly of freshly ironed cotton. Yum!

(Alas, yes, I do use a dryer. Although our drying rack is usually equally full once I′ve emptied the washer.)

But what to do when the grass stains or the clay stains or whatever need extra cleaning? Sometimes spot treatment with Berry+ will do the trick. Sometimes it won′t.

Ellen Sandbeck′s chapter on laundry educated me about an old-fashioned product that′s never truly left the cleaning lexicon and is now enjoying a resurgence of use: 20 Mule Team Borax, around since 1891.

photo of box of 20 Mule Team BoraxBorax is a naturally occurring mineral salt composed of boron, sodium, oxygen, and water. It functions as a water softener, fabric softener, deodorant, and mild bleach. I add 2 – 4 tablespoons of it to a load when I face especially challenging laundry. (Or apply a paste of it to the stubborn spot.)

Is it perfect?

No.

But it′s helpful to have a stronger benign option in my tool kit.

The Well-Tempered Clavier

Sandbeck compares a happy home to J.S. Bach′s harpsichord after it has been tuned by the method he invented. No one key is perfectly in tune, but all are sufficiently so to sound good. Compromises must be made. (The method before Bach′s invention resulted in one key perfectly in tune and the rest decidedly out of tune.)

Sandbeck says: ″Most people are happiest and at ease in homes that are moderately clean and neat. Both extremes . . . tend to make people unhappy and uncomfortable.″ Also: ″The well-tempered house should be just neat and clean enough to make both the neatest person and the sloppiest person in the household just a tiny bit dissatisfied.″

Sounds fair to me!

* * *

Those are my three favorite snippets from Green Housekeeping, but the book′s packed with tips. Your favorites will likely be different than mine, since homes vary as much as their inhabitants. I invite you to find yours!

Green Housekeeping at Amazon

Green Housekeeping at B&N

Berry+ at reuseit.com

Soap Nuts at NaturOli

For more on green living, see:
Grass Green
Great Soap & Etcetera Quest
Wrapping with Cloth


Share

Golden Green

I encountered the basic principle young. Clean up after yourself. No fair making your neighbor put your fingerpaints away. Don’t waste things, time, effort. Not right losing Dad’s favorite flashlight after he lent it to keep the bogeyman away. It was the golden rule: do as you would be done by. Connecting this elementary idea to a larger world view took . . . years, took growing up; but there were mile posts along the way.

A photo from an educational magazine – distributed to the entire fifth grade of Montgomery County – remains vivid in my memory. It depicted a family picnicking on a slope. But the hillside of scruffy grass overlooked a six-lane highway, and the sky was brown with smog. Turn the page and the family had been transplanted to a parkland paradise: lush green hills, a clear stream, shy wildlife, and blue sky. Which would you prefer?

Yes, this was 1970, when environmental concern grew apace. I was an impressionable ten-year-old and wanted to do my part, but it wasn’t clear what part was mine. “Don’t litter” was a big campaign at the time. It seemed overly basic.

My next milestone came in college. The desire to recycle gripped me. Newsprint and glass jars were the only candidates, and there was no curbside recycling. Oh, did I ever want to participate! But how? I didn’t own a car, and the recycling center was decidedly beyond walking distance. I never did figure out a way, but I made a vow: once I had wheels, I’d be driving to that center as often as I had a bin full.

I kept that vow, but feel some irony looking back: the exhaust coming out my car’s tailpipe probably did far more harm than would a small collection of glass and newsprint in a landfill. And humans have since devised more dangerous substances with which to strew our earth home. What happens to the nano particles created in the manufacture of computer hard drives? What about the discontinued GMO corn that made volunteer eaters so sick? It’s easy to become discouraged. It’s easy to focus on smaller areas where we have some power – I can recycle, after all – and lose sight of larger problems in need of complex, cooperative solutions.

And, yet, I always come back to: it’s important to me that I do what I can do, mistakes and all. Perhaps I should have stuck with bicycling (and not worried about recycling) after I graduated with my architecture degree. But the recycling was still worthwhile, and I still do it. And don’t litter – be it apple cores and household cleaners or nanoparticles and modified genes – still seems a motto to live by.

Since then I’ve made other changes. I eat local veggies and grass-fed meat. I clean with vinegar, peroxide, castile soap, and micro-fiber rags. I use soap nuts for my laundry and a drying rack. I’ve switched out my incandescent lightbulbs for CFL’s. I group errands so I can take the car out less. My kitchen is stocked with reusable containers, so that bag lunches and food storage need not involve disposables. Our mower is muscle-powered. Is all this trivial? Misguided? Perhaps. But surely profligate driving, reckless chemical use, and relentless disposing of disposables would be worse.

I’ve even set my sights on further changes. No surprise there, given my proclivity for shaking my life up from time to time! I hope my next car will be a hybrid. (And that one in the further future will be wholly electric! How to place a charging station when we have no garage?) My push toward more bicycle riding resulted in a broken foot, but I haven’t renounced that dream wholly. (The peddling and gliding are too much fun!) I want to weatherproof my home, so I can be one of those folk whose winter needs are solved with the equivalent of a space heater. Perhaps I might even manage solar panels on the roof!

I talk about the solutions I’m trying. I ask what others are doing. I read to learn more. Am I naïve? Almost certainly, yes. But cynicism and pessimism seem a waste of the life and breath I’ve been given. I’ve chosen effort and hope. What about you?

Share