Bandanna Gift Wrap

four packages wrapped in bandannasBandanna gift wrapping came to my household through sheer desperation. It was the middle of November several years ago, and I’d just ripped the cartilage in my hip joint. I could not stand without pain. Walking was even more difficult. How was I to do all the holiday prep needed to make our winter celebration a celebration?

The gifts were largely already acquired. I’d started early. And my husband, with his background of restaurant cooking, took over both daily meal prep and holiday meal planning. But I’d always been the gift wrapper, and the regular wrapping deal was not going to work this time.

I decided to throw money at the problem: reuseit.com stocked some really festive cloth bags with ribbon closures. I’d seen them and coveted them, but refrained due to their pricey nature. Now, I would refrain no longer. (Although, since these would envelop family presents, they could be used again and again. So the short-term expense would likely be a long-term savings.)

I purchased a bundle of them, winced at my total at checkout, and clicked the finalizing button.

And my solution working excellently. I merely popped each gift into its bag, tied the ribbon, and safety pinned a tag on it. Done!

The ease and simplicity spoiled me for gift wrapping from then on. I didn’t want to go back to paper. The cloth bags were prettier, easier, and didn’t contribute to our overfull landfills. But . . . eight dollars or more per bag? Ouch!

I perused the reuseit site again. Was there anything less expensive? No. There were only more expensive options! But one of them gave me an idea. It was a beautiful wrapping cloth derived from Japanese heritage. The how-to video showed the simple method by which one secured the cloth around a gift. And I thought: why not use a bandanna? I can get those for a dollar each!

I never looked back. Birthdays, anniversaries, housewarmings, hospitality – all these occasions feature bandanna-wrapped gifts from me. Since we have winter holidays approaching as I write this, I want to show you how I do it. Maybe you’d like to try it yourself!

First, gather your supplies: bandannas, gift tags (I use small white paper circles that I cut myself), and safety pins.

bandannas, tags, safety pins

Next, place the gift on your chosen bandanna and wrap the the cloth around it.

photos of wrapping bandanna around gift

Then gather the two pointy ends in your hands, bring them together, and tie a knot. Arrange the folds of cloth to look good. They will stay put, especially if you make the knot snug.

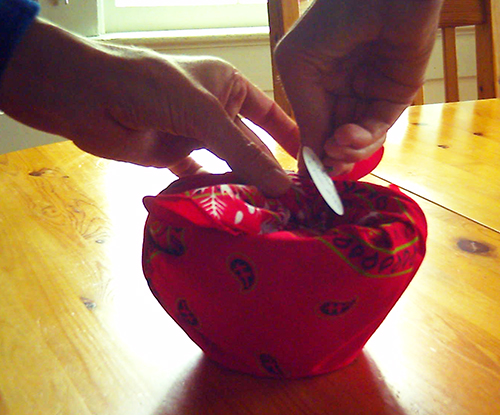
Now pin your tag onto the bandanna. I usually put it to one side of the knot, to make it easy for the opener to untie the knot.

hands poised to pin tag on gift

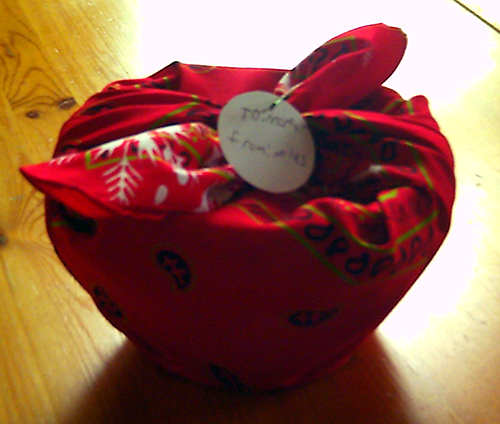
And there you have it! No cutting – and cutting too small or too big. No taping and then taping it again when the paper starts to unfurl. Just fold the cloth around your gift and tie.

photo of gift wrapped in bandanna

Bonus tip: last year we had some really bulky gifts. I bought fabric at a sewing store, used pinking sheers to prevent the edges from unraveling, and ribbons to secure the ends (like a giant toffee). No need to abandon my cloth habit, just because bandannas weren’t big enough!

Update: Videos showing wrapping with cloth here!

For more on green living, see:
Waste-Free Lunch
Green Housekeeping
Great Soap & Etcetera Quest


Share

Going Up Like Smoke?

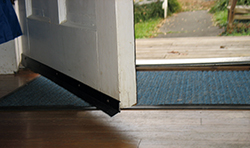
photo looking out the front doorThink of your house as a chimney.

Cold air seeps inside under the front door and the back. Cold air creeps through any breaks in the insulation on the outer walls. Cold air gathers atop the foundation wall where the floor joists rest.

Once within, the cold air warms and rises. Rises to the ceilings, rises up the stairwell, and then soars out the attic fan or the gable vents. Whoosh! There’s a draft, a current, to pull more chilly air in at the bottom. Which warms and rises and leaves.

That’s how a house without air sealing works! It’s not the way to stay warm in winter. Sealing the leaks in a building’s envelope is more critical than beefing up its insulation. A house with no leaks and little insulation will stay warmer than one with lots of leaks and lots of insulation.

(Yes, it’s late fall as I write this, and today was cold, so I’m focused on heat. But air sealed houses retain their cool air in summer better, too.)

My house was built in 1949 and featured lots of leaks when we bought it. Heating it in cold weather cost a fortune! My husband and I added insulation to the crawl spaces under the roof, and that helped the rooms immediately under the roof feel cooler in summer and warmer in winter. But our utility bills remained high.

We signed up for a mini energy audit offered by our electricity provider and learned both why and what to do. More than anything our home needed air sealing. And there were some simple ways to improve its leaky state.


photo of air sealed fanThe first step was closing off any upper escape hatches for warm air. Without that suction, less cold air would be drawn into the house. For us, this was the whole house fan at the top of the steps. All the insulating in the eaves had also air sealed them. We just hadn’t finished the upper level job when we left the fan as we found it. And that one opening was ample as a chimney top! Whoosh!

There are expensive covers you can buy to seal off whole house fans, but we opted for the cheap solution: insulation panels of rigid foam secured by painter’s tape. Not elegant, perhaps, but neat and functional.
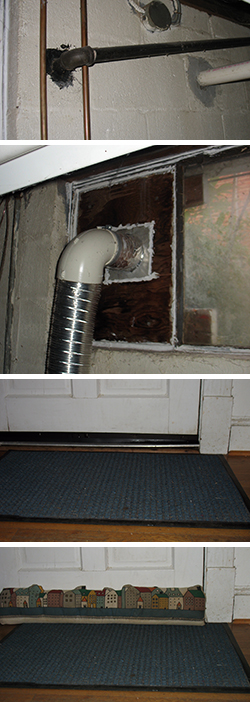
 

photos of air sealed leaksThe next steps involved locating all the undesired air intakes. All our exterior doors featured gaping cracks between door and threshold. The water and gas supply pipes displayed daylight shining through their holes in the basement cinderblocks. The dryer vent, likewise. And all the electrical outlets on the outer wall acted as conduits of cold air from outside to inside.


We used sprayable foam to seal the pipes.


We used calk to seal the dryer vent.


The front, back, and basement doors received bottom sweeps. Plus the front door, cut extra high off the floor by the previous owners to clear what must have been a very plush carpet, is reinforced by a sort of “pillow” designed to block draughts.


photos of air sealing an electrical outletWe sealed the electrical outlet boxes like this:


1 • Flip the circuit breaker for the outlet to off (or remove its fuse, if you have a fuse box). If your screwdriver should slip, you don’t want it slipping into a live socket!


2 • Remove the old cover.


3 • Place a special insulation pad over the gaps around the outlet. These may be purchased in a hardware store. Don’t jury rig your own with styrofoam trays or something else which might be flammable. Live electricity is close to the pad – don’t risk a fire!


4 • Replace the standard cover with a child safety cover. The sliding protectors not only keep little fingers out, they stop airflow!


Our energy auditor also recommended we seal the gap that most older houses have above the foundation wall. The floor joists rest there, and only one thin 2×8 separates outside from inside. Sealing the joist area is more involved than all the other projects I’ve described, so it’s still on our to-do list. I sealed one of those cold-air pockets this afternoon, and took photos, so you can see how the project goes. It is something a home owner can do him- or herself.


photos of the process1 • Gather your tools: utility blade, old bread knife, goggles, gloves.

2 • Gather your materials: rigid insulation, paper for a pattern, spray foam.

3 • Use the paper to make a pattern. I merely folded and taped mine, fairly roughly. Then I traced it onto the rigid insulation.

4 • Cut 2 rectangles of rigid insulation and check the fit. Mine were initially too large, so I had to trim them. Twice! You definitely don’t want to be trimming after you’ve started spraying foam. The utility blade worked fine for my first cut. Zoop! Snap! Done! It kept catching after that and giving a very jagged edge. The old bread knife worked really well. (Really! Weird, huh?)

5 • Put on the goggles and your gloves. I wondered if I really needed all the protective gear. I did! All the photos I’d seen of the procedure in a DIY book made it look neat and tidy. And the spray can featured a lovely trigger. How messy could it be? For a non-pro: very messy! The foam emerged from the nozzle in unpredictable spurts. It dripped and occasionally went wild. The nozzle fell off once between spraying sessions, and I had to attach the oozy straw to the dispenser. I ended with spray foam all over my gloves, some on the wrist cuff of my new sweatshirt, and one far-flung gob on the drawer of the tool chest! Wear the gloves and the goggles. The foam is not benign on the skin or in an eye!

6 • Spray the corners of the “box” at the end of the joists with foam.

7 • Place the first rigid insulation rectangle; the foam will harden in a few minutes and hold it in place.

8 • Spray the edges of the rigid insulation where they meet wood.

9 • Place the second rectangle of rigid insulation and spray its edges.

10 • Keep going with the next joist over! The spray foam is best used all in one session of DIY. It clogs the dispenser, if it sits unused for more than 2 hours after the first spray. And once it clogs, it’s done.

This afternoon’s sealing session went pretty smoothly, despite the mess. My photos show that my work is definitely not neat. But it’s not a Jackson Pollock painting either! I’m thinking we should move the complete project higher among our priorities. It might take a weekend, but it won’t be hard.

In the meantime, how is our house performing? Are our energy bills still going up like smoke? Well . . . no. Or, at least, not right now. The cost per BTU may keep shooting for the moon, but the January bill after our air sealing was $100 less than the previous (un-air-sealed) January. And it wasn’t because the weather was warmer. That particular month delivered extra snowfall and extra chill. So even the simplest air sealing projects paid big dividends.

Have you tackled any energy-efficiency projects on your home? Were they challenging? Easy? Did your bills go down? I’d love to hear about your experiences.

For more on green living, see:
Green Housekeeping
Grass Green
Permaculture Gardening


Share

A…Not Exactly Sad Story

art by Kay Nielsen depicting a queen in her gardenThere I was: smack in the middle of revisions on Livli’s Gift.

Mahde had slung his arm across Livli’s shoulders. Thoivra glared at them both. It was tense.

Then my computer screen went black. The fan shut off.

Hmm. This had happened 3 days ago. Being no tech expert, I let the laptop cool — it was very warm — and pushed the on button.

No go.

Again?

Ah! Happiness and light! The hard drive started spinning. The screen came to life. And the start-up process moved forward. I was back in business, getting Livli ready for publication.

I worked all Wednesday and all Thursday. One more day, and the revisions would be complete! Friday was the day!

Indeed, it was.

Friday was the day the computer screen went black, and no amount of button-pushing would change it.

My local, friendly IT shop couldn’t fit me into their schedule until Monday, and that was that. I toted the laptop to their premises, left it, noted the hollow feeling in my middle — no computer! eek! — and went home to devote myself to family and neglected household chores.

Come Monday morning: no word.

Monday afternoon: still no word.

Monday evening: nothing all day.

What happened?

As it chanced, vacation, in-shop miscommunication, and an avalanche of other clients pushed me into limbo. They more than made it up to me when they caught their glitch, so no hard feelings, but the news on Tuesday was dire.

There would be no resurection for my electronic necessity.

I’d known for a while that a new computer lay in my future. I hadn’t planned on that future arriving quite so immediately, but . . . the time was now.

Mere minutes after the fateful phone call I was in the car on my way to the store. Half an hour after that, I was home with a new machine. And that evening I viewed the carcass of the old machine while the IT gentleman transferred my files from the old hard drive to the new . . . not hard drive. (The new computer has a solid state form of memory with no moving parts. Like a giant flash drive. Cool!)

While we waited for files to transfer, I received a gratis tour of my new possession along with tips on Time Machine and Roku, plus the downloading of the latest OpenOffice software. Thank you, Jeremiah! It was a much-needed education.

So, now I was all set, right?

Not exactly.

I was all set for finishing the Livli revisions. And I’ve done so. My readers are checking the manuscript now. I hope to publish soon!

B-u-t . . .

That was a jouncy 5 days there. Days when none of my work got touched (let alone done). And I’ve still got clean-up to do, software to purchase.

Which means . . . this sad story is my blog post for the week! Perhaps the title should be: We Are Techno-Dependant!

Grin!


Share

Golden Green

I encountered the basic principle young. Clean up after yourself. No fair making your neighbor put your fingerpaints away. Don’t waste things, time, effort. Not right losing Dad’s favorite flashlight after he lent it to keep the bogeyman away. It was the golden rule: do as you would be done by. Connecting this elementary idea to a larger world view took . . . years, took growing up; but there were mile posts along the way.

A photo from an educational magazine – distributed to the entire fifth grade of Montgomery County – remains vivid in my memory. It depicted a family picnicking on a slope. But the hillside of scruffy grass overlooked a six-lane highway, and the sky was brown with smog. Turn the page and the family had been transplanted to a parkland paradise: lush green hills, a clear stream, shy wildlife, and blue sky. Which would you prefer?

Yes, this was 1970, when environmental concern grew apace. I was an impressionable ten-year-old and wanted to do my part, but it wasn’t clear what part was mine. “Don’t litter” was a big campaign at the time. It seemed overly basic.

My next milestone came in college. The desire to recycle gripped me. Newsprint and glass jars were the only candidates, and there was no curbside recycling. Oh, did I ever want to participate! But how? I didn’t own a car, and the recycling center was decidedly beyond walking distance. I never did figure out a way, but I made a vow: once I had wheels, I’d be driving to that center as often as I had a bin full.

I kept that vow, but feel some irony looking back: the exhaust coming out my car’s tailpipe probably did far more harm than would a small collection of glass and newsprint in a landfill. And humans have since devised more dangerous substances with which to strew our earth home. What happens to the nano particles created in the manufacture of computer hard drives? What about the discontinued GMO corn that made volunteer eaters so sick? It’s easy to become discouraged. It’s easy to focus on smaller areas where we have some power – I can recycle, after all – and lose sight of larger problems in need of complex, cooperative solutions.

And, yet, I always come back to: it’s important to me that I do what I can do, mistakes and all. Perhaps I should have stuck with bicycling (and not worried about recycling) after I graduated with my architecture degree. But the recycling was still worthwhile, and I still do it. And don’t litter – be it apple cores and household cleaners or nanoparticles and modified genes – still seems a motto to live by.

Since then I’ve made other changes. I eat local veggies and grass-fed meat. I clean with vinegar, peroxide, castile soap, and micro-fiber rags. I use soap nuts for my laundry and a drying rack. I’ve switched out my incandescent lightbulbs for CFL’s. I group errands so I can take the car out less. My kitchen is stocked with reusable containers, so that bag lunches and food storage need not involve disposables. Our mower is muscle-powered. Is all this trivial? Misguided? Perhaps. But surely profligate driving, reckless chemical use, and relentless disposing of disposables would be worse.

I’ve even set my sights on further changes. No surprise there, given my proclivity for shaking my life up from time to time! I hope my next car will be a hybrid. (And that one in the further future will be wholly electric! How to place a charging station when we have no garage?) My push toward more bicycle riding resulted in a broken foot, but I haven’t renounced that dream wholly. (The peddling and gliding are too much fun!) I want to weatherproof my home, so I can be one of those folk whose winter needs are solved with the equivalent of a space heater. Perhaps I might even manage solar panels on the roof!

I talk about the solutions I’m trying. I ask what others are doing. I read to learn more. Am I naïve? Almost certainly, yes. But cynicism and pessimism seem a waste of the life and breath I’ve been given. I’ve chosen effort and hope. What about you?

Share

Welcome

Hello, I’m glad you’ve come to visit. I’m still working on my web site, still learning about having a web site. It’s all new to me. I intend to post about once a week, sometimes more often. I plan to add pages on topics that interest me. I hope some of them will interest you! I trust that this spot will become more intriguing as the weeks go by. Check back from time to time. There’s sure to be something new!

Share