Building Rainbow’s Cover

art for Rainbow's Lodestone

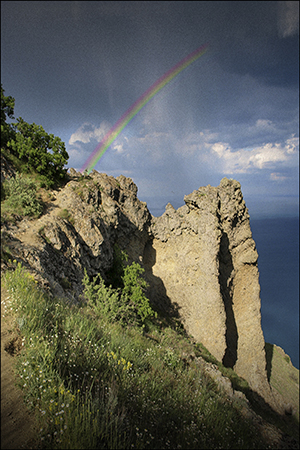
The first time I created a book cover for Rainbow’s Lodestone, I couldn’t find any art that looked like my spirit of the rainbow. So I settled for a landscape. It was a dramatic landscape – beautiful – and it had a rainbow against a looming cloudy sky. But I didn’t think it conveyed the essence of my story well.

art for original Rainbow's Lodestone cover
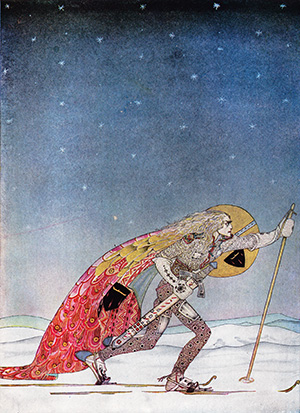
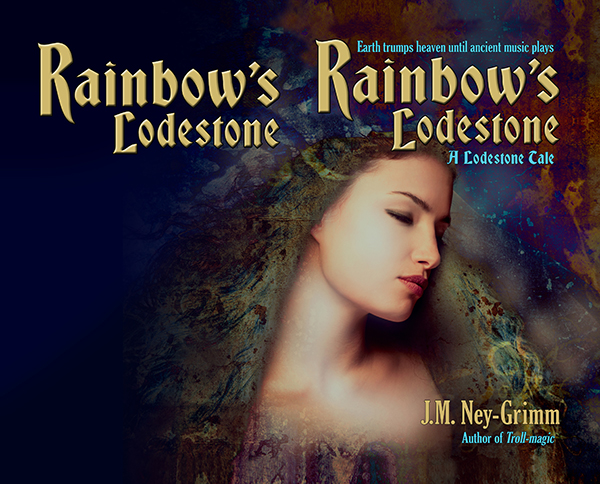
So, when I was ready to create the paperback edition of Rainbow’s Lodestone, I went looking for more suitable art. And I found exactly what I was looking for. The instant I set eyes on the image, I said to myself, “That’s her!”

It was exciting. I purchased the right to use the image on my cover.

The first thing to do was flip the image. I wanted the spirit of light looking to the right, supporting the eye’s natural tendency to move from the top left corner of an image to the bottom right.

The next adjustment needed was creating room for a title. As you can see (above), the art didn’t have room at the top. Nor did it have much room at the bottom for my author byline. I had some work to do. I started to “paint” the extra margins I needed.

I’ve talked before about this “painting” I do in Photoshop. You might be wondering what I mean since that’s not very specific.

This is what I do to extend the background: I take the “lasso” tool and draw a rough shape around a suitable piece of the background. Then I “feather” the edge of my selection, essentially creating a fuzzy edge instead of a crisp one. Next I copy my selection and paste it on a new layer in my file. I move it around until it looks good. Then I merge it back onto the main layer.

That’s it in a nutshell.

But I do it over and over again to fill in the area I need.

modified art for Rainbow's Lodetone

The next steps were less time intensive.

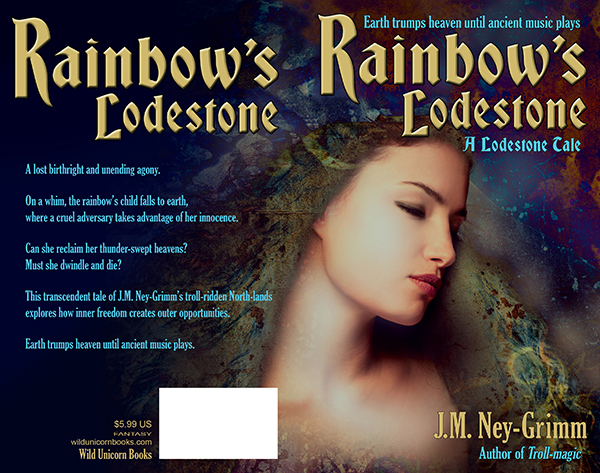
I assessed the back cover area to discern whether type would be easily read atop it. Rarely is it just fine as is. Usually I must either lighten it to receive dark type or darken it to receive light type. Additionally, if there is a lot of variation in lightness and darkness, I must even it out.

Type needs a fairly bland background behind it in order to be easy on the reading eyes.

The art for Rainbow’s Lodestone didn’t extend far enough to the left after I’d added to the top. I could have “painted” yet more background, but I had a better plan in mind.

I sampled three colors from the back ground: a dark blue, a dark aqua, and a black. I selected large irregular triangles in the area that needed to be filled – feathered the edges a lot – and filled them with these three colors. The result was a varying wash of color that blended with the art and also yielded a good background for the back cover text.

Rainbow art with title

The Lodestone Tales follow the lodestones created by Zandro Mytris through the history of my North-lands. Which means I want the covers for all of the stories to look like they belong together.

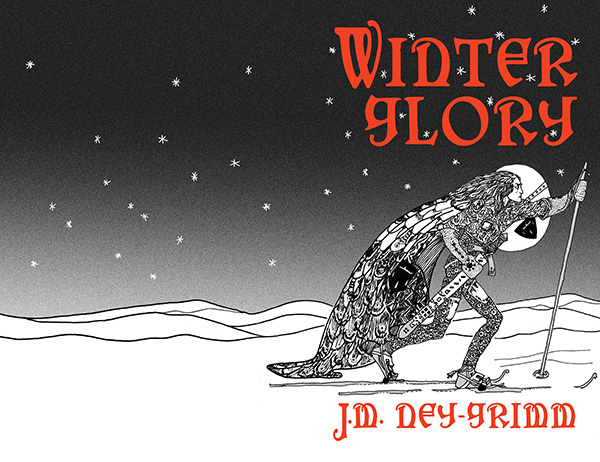
I’d already chosen the font Bradley Gratis for the titles of the books and the font Gloucester for the tag lines and the back cover text. Working with those choices, I placed the title on the front cover so that it lined up with one edge of the cover and framed the art. Adding my byline and the tag lines was a straight forward matter.

Rainbow’s Lodestone is a short story, which means that its “blurb” is fairly short. I wouldn’t want to plump up the blurb with a lot of spoilers! I had to play with the best size for the text and line spacing, as well as seeking the best way to break the text into paragraphs. It was a matter of trying different arrangements until I got one that looked good.

I submitted this cover to a design contest held every month by Joel Friedlander. He’s a publishing and design professional active in the indie publishing world, and his good opinion is very worth having. I was delighted when Rainbow’s Lodestone won a rare and coveted gold star award!

(Rainbow’s Lodestone is the 30th in the long column of covers shown. Joel doesn’t list them by rank, but randomly.)

Paperback cover for Rainbow's Lodestone

To see more cover builds:
Building Star-drake’s Cover
Building Wild’s Cover
Cover Creation: Perilous Chance

For the basic principles of cover design:
Cover Design Primer


Share

Building Glory’s Cover

y Magnus Sjöberg (Larsson), photo used under a Creative Commons license, FlickrI was so lucky finding images that were perfect for the covers of Fate’s Door and Caught in Amber, I hoped I might be equally lucky with photos for Winter Glory.

I found a gorgeous northern landscape: a snow-covered pine forest with the sun setting through the tree trunks. (Similar to the photo at left.) But I couldn’t find anyone who looked like Ivvar.

This didn’t truly surprise me. Ivvar’s a tall fellow with shoulder-length gray dreadlocks and tan skin. Not tanned by sunlight, but naturally tan, the way my Hammarleedings are.

I searched for a photo of Ivvar last October when I finished writing Winter Glory. I searched in November when I got feedback from my first reader and started revisions. I searched in January when I received feedback from my second reader and made more revisions. I searched in February when the file came back from my proofreader with typos corrected.

I searched one last time when it was time to create the cover.

illustration for East of the Sun and West of the MoonThen I had to face the fact that I simply was not going to find Ivvar photographed by chance by a modern photographer. 😀

I wasn’t panicked. I had a plan B. I would use the illustration by Kay Nielsen for “So the man gave him a pair of snow-shoes” in East of the Sun and West of the Moon. It’s a gorgeous piece of art. It was probably for the best that I’d failed to find a good photo.

As I scanned the Nielsen art, I talked with my husband about my plan for the cover. He was in the other room, so he was not looking at the piece of art concerned. He said: “Oh, yeah! You’ll make one of those black & white covers, like the ones for Troll-magic and Sarvet’s Wanderyar. Great! They’re really your trademark look.”

Right then and there I had an epiphany.

The art showing a man on skies is a color piece. But in the time it took my husband to speak, I’d envisioned it rendered in black & white, and I loved it.

Plus my husband’s suggestion made so much sense. A color painting would be a whole new look for one of my books. But a black & white Kay Nielsen piece would fit right in with the other North-lands and Hammarleeding books.

And I was sure I could do it. The print quality on the black & white illustrations of my 1914 edition of East of the Sun and West of the Moon is very poor. In order to get a clean image for my covers with Kay Nielsen art – crisp lines without inkblots, black blacks, and white whites – I’d always placed the art on a light table and traced it.

I was certain I could do the same for a color illustration. It would be trickier. I’d be making value judgements all the way through about how to render shades of color as either shades of gray or patterns of black & white lines. But Nielsen’s work lends itself to black & white interpretation. Even his color work has interesting line and texture present.

I scrutinized the piece of art depicting the skier. Yes! I could see in my mind’s eye exactly how I would do it.

So I set to work.

black & white sketch for Winter Glory

I was nervous at first. So nervous that my hand kept shaking. I had to talk myself down. “Jessica, any small mistakes can be corrected in Photoshop. And if you make a big mistake, it won’t be the worst thing if you have to start over. Relax. Relax. Relax.”

My hand was still not steady with that first line of ink on paper. I got a fresh sheet of paper. And started on the skier’s hair, which was supposed to be squiggley. By the time I finished the hair, my hand was steady. I’d forgotten my nerves and was enjoying the drawing.

I was almost sad when I finished, except that there was more fun ahead.

I scanned my black & white drawing into my computer and started building the cover for Winter Glory.

The first step was to select the stars and turn them from black to white. Then I put a gradient screen from the top of the cover to the bottom, thus creating the sky. I loved how that made the skier pop!

Adding the sky to the cover for Winter Glory

Next step? The title.

I already knew I wanted to use the cloak texture from the original color illustration, but I wanted to get the title’s size and placement settled using Photoshop’s type managing tools. I would turn the layer from a type layer to an image layer after I got the type exactly the way I wanted it. So I used a bright red to help me visualize the final result.

Adding title and byline to the cover for Winter Glory

The cloak in the original illustration was a lovely patch of color. It was big enough that I could have just selected it and “pasted it inside” of the letters of the title and my author byline. But it would have been a lot of pasting.

cloak textureSo I made a square of the texture first – pasting and pasting and pasting that cloak patch into a separate file. I increased the saturation, and heightened the reds and yellows to achieve the effect I wanted.

Once the cloak texture file was ready, I selected the whole square and pasted that inside the letters of my cover file. It took four pastes to fill them all. Instead of ten or more!

The textured title softened the overall effect of the art. The black & white art with the solid red title has a crisp and definite look that I like. But it’s a little too hard-edged for the story, which blends life-threatening action with romance.

Winter Glory cover with textured title

Then I was closing in on the finish line.

I added the tag lines – one above the title, one below my author byline. And my trademark line, connecting the big “J” to “Author of Sarvet’s Wanderyar.”

I placed the back cover copy. I placed the title on the back cover. Next came the spine: title, byline, and Wild Unicorn logo.

And finally the publisher info and the box for the barcode.

I was done! It’s ready to be placed in an InDesign file for the paperback cover, and to be windowed for the ebook cover. 😀

Glory cov build 7

For more cover builds:
Cover Creation: Perilous Chance
Building Star-drake’s Cover
Creating Livli’s Cover

For the principles of cover design:
Cover Design Primer


Share

Cover Preview: Winter Glory

I’m writing a lot, and exciting things are happening with my work in progress, Fate’s Door. I can’t wait to share the story with you. I’m hoping for a May release – fingers crossed – but I won’t rush the story telling. If it takes me longer to finish, that release may slide to June. 😉

I’ve also been working on book covers for the stories that are complete and approaching release to my readers.

Winter Glory came back from my proofreader (thank you, Wendy, fantastic work!) about a week ago. The interior of the book is now all ready, and today I finished the cover! Naturally, I want to show you what it looks like.

I’m really pleased with how it turned out, and I’ll share how I built it in a future post.

Glory feature cover 300

In the cold, forested North-lands – prowled by trolls and ice tigers, redolent with the aroma of pine, and shrouded in snow – Ivvar seeks only to meet his newborn great granddaughter.

Someone else has the same plan.

Traversing the wilderness toward the infant’s home camp, Ivvar must face the woman he once cherished and an ancient leviathan of the chilly woodlands in a complicated dance of love and death.

Ivvar’s second chance at happiness – and his life – hang in the balance.

Coming soon!


Share